Now that Input Director is up and running and configured on your systems you're ready to start using it:
Assuming you had configured your Client system as being to the right of your Director system (look here if you're not sure what side you've configured your client system on) then using your mouse you should be able to move your cursor to the right so that it goes beyond the right-side of the screen, it should disappear and re-appear on your client system screen. Anything you now type will be sent to the client system. To switch back to the Director system, simply reverse the process and move the cursor to the left side of client screen and keep going until it re-appears on the Director system.
For transitions using the mouse, there are a variety of transition options that can be set:
If you've set a hotkey for the client system, you can use that by hitting your hotkey combination. The cursor should appear in the center of the client screen and you'll find that your mouse and keyboard input is now being redirected to that system.
You can also set up hotkeys to move the cursor between systems by their relative positions: left, right, up and down. These hotkeys are configured under the Director Preferences tab.
There is also a hotkey to return the cursor to the Director system at any time (see next section)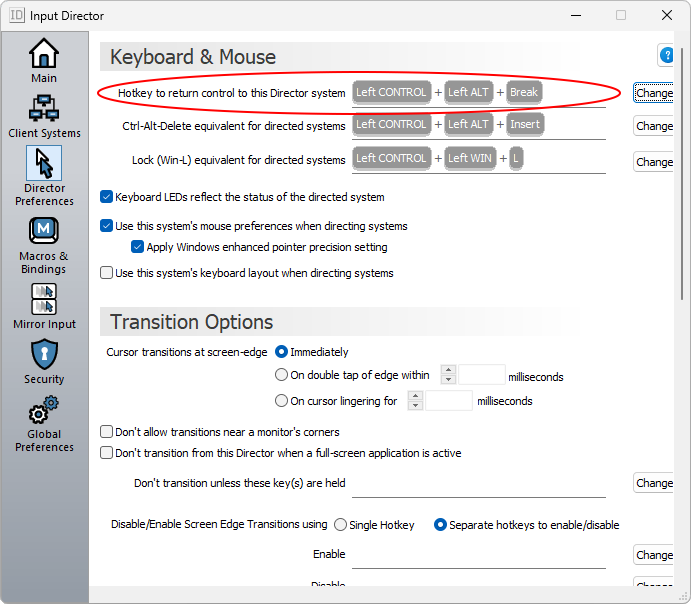
If you wish to use a hotkey or if you start an application on the client system that causes that system to freeze and you need to return control to the Director system, the default hotkey is left ctrl + left alt + control-break (control-break is the key marked pause/break to the right of the scroll-lock key on a standard keyboard). You can change this hotkey from the Director Preferences tab:
If things get really stuck, you can always hit ctrl-alt-delete to regain control of input.
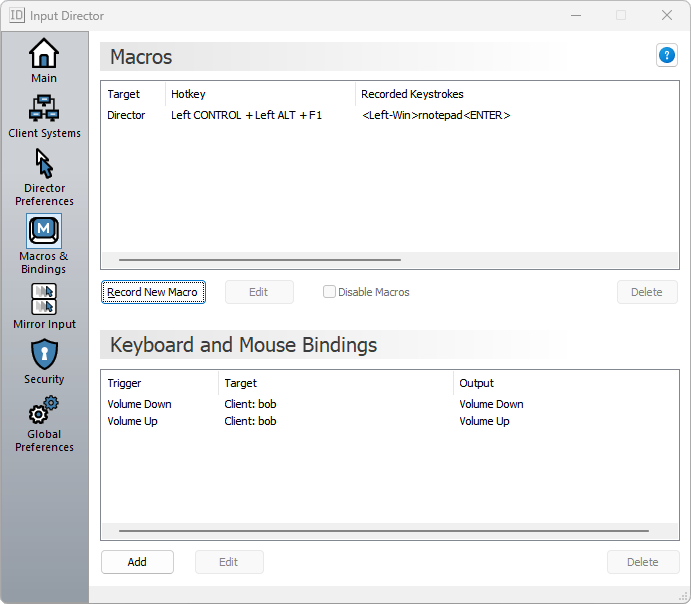
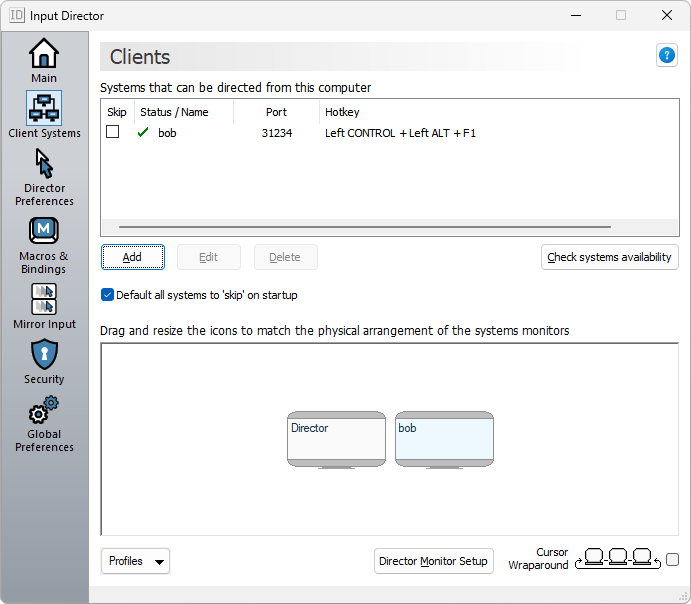
On the Client Systems tab, a client can be temporarily marked as one to be "skipped" when transitioning between systems. For example:
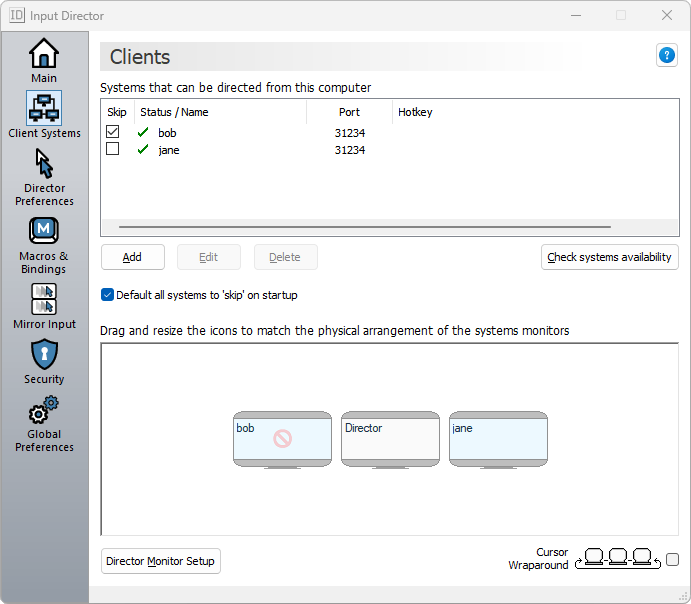
In this screenshot the Client system jane is positioned between bob and the Director system but has its Skip flag checked. When moving the cursor between the Director System and the remaining client, Input Director will treat the jane client as if it isn't there. A client's skip flag setting is temporary and not remembered between restarting Input Director or rebooting the Windows system.
You can quickly unskip a client by using its hotkey to switch over to it. If the switch is successful, the client's skip flag will be cleared.
Once you have Input Director running and configured it is beneficial to turn on the "Default all systems to skip on startup". With this option on, all client systems are set to be skipped on startup. When a client system becomes available (for example you boot a client computer) it will attempt to communicate with the Director and let it know that it is now available. The Director will then automatically 'unskip' the client and let you know that it is now available. This option will help to avoid transitioning to a client that is not yet ready. Clients will inform the Director if they're being shutdown or rebooted and the Director will accordingly 'skip' them.
To learn more about client skipping, have a look here in the FAQ.
Using the shared clipboard across systems is as simple as using the Windows clipboard normally. Copy the content or files on one system, transition across to another system and paste. Input Director supports most clipboard data formats. More information on the shared clipboard can be found in the FAQ
Using Win-L to lock your system will always lock the Director system, regardless of which system you're controlling at the time. This is a Windows security feature. To simulate Win-L on a client system, use Ctrl-Win-L instead (this hotkey will also work on the Director). You can change this hotkey on the Director Preferences tab.
Hitting Ctrl-Alt-Delete will always activate on the Director, regardless of which system you're controlling. This is a Windows security feature. To simulate Ctrl-Alt-Delete on a client system, use Ctrl-Alt-Insert (sometimes Insert is marked as "Ins" on a keyboard). This hotkey will also work on the Director system. You can change this hotkey on the Director Preferences tab.
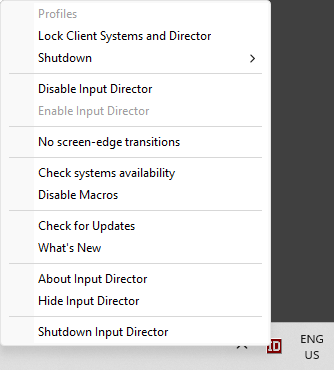
If you right-click on the "ID" icon on the notification status bar, you will be presented with a shortcut menu that lets you disable/enable Input Director, shutdown it down, etc:
A Client must, on its Security tab, have the "If directed to shutdown" option set. Click here to see more information about this setting. The "Lock Client Systems and Director" operates similarly.
If Input Director is hidden, you can double-click the left mouse-button on the "ID" icon to display the Input Director window.
To configure Input Director for a group of computers so that any of their mice/keyboards can be used to control any of the computers, run through the Quick Setup steps and set up each computer as a Director for the others.

A profile encapsulates the client systems and their configurations, the monitor layout and options found on the "Client Systems" tab.
Creating a new profile is straightforward using the profiles menu and includes the ability to take a copy of the active profile as a starting point.
There are 5 ways to switch between profiles:
Profiles are useful for many different situations, such as:
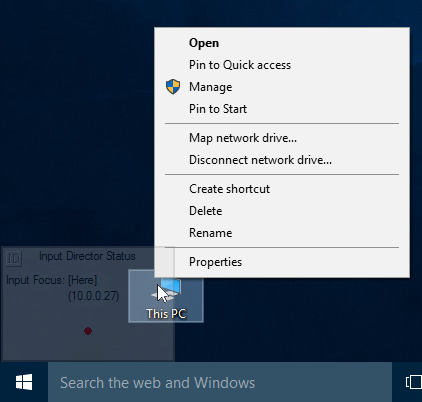
If you often find yourself opening/editing files that are located on one of your other computers, Input Director makes it easy to open a file or directory on any other computer.
Using Windows Explorer, if you right-click on a file or directory that is accessible via a network share, an Input Director menu item will be included in the pop-up menu.
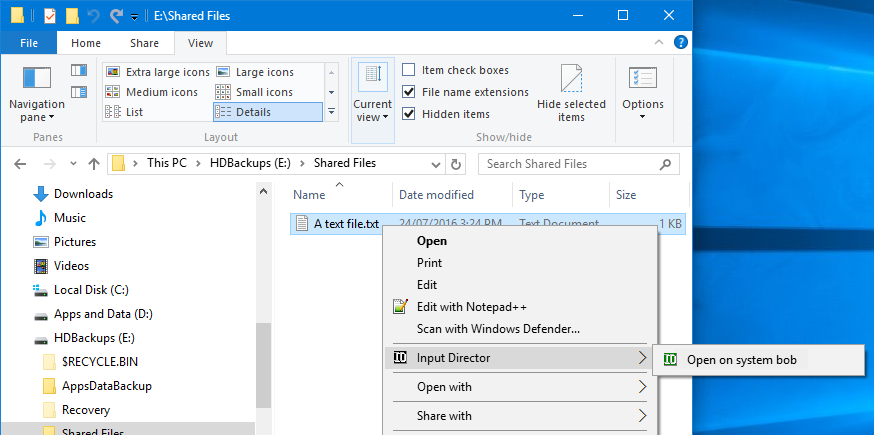
You can then elect to open the file on one of your other Input Director computers. If you hold down left-shift when right-clicking on the file, Input Director will also switch input control to that system.
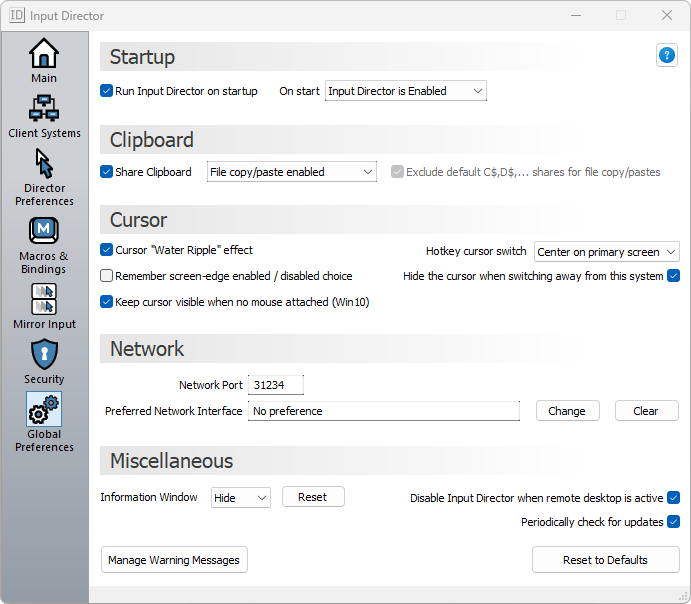
Startup -
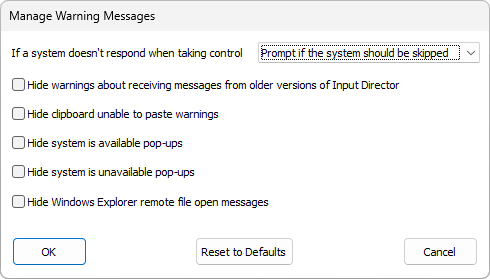
Manage Warning Messages - Clicking on the "Manage Warning Messages" button will pop-up the following window allowing you to manage which notifications should display:

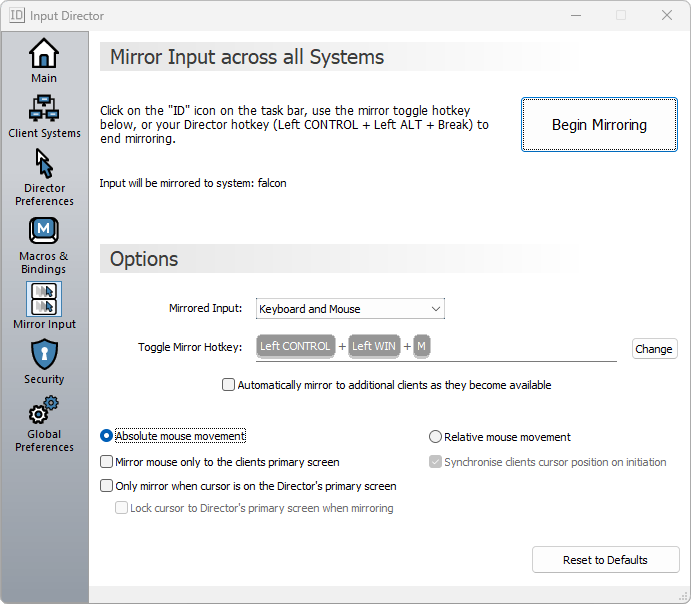
Input Director can mirror input across the Director and all client systems simultaneously. To do so, simply click the click the "Begin Mirroring" button or set a hotkey to do so.
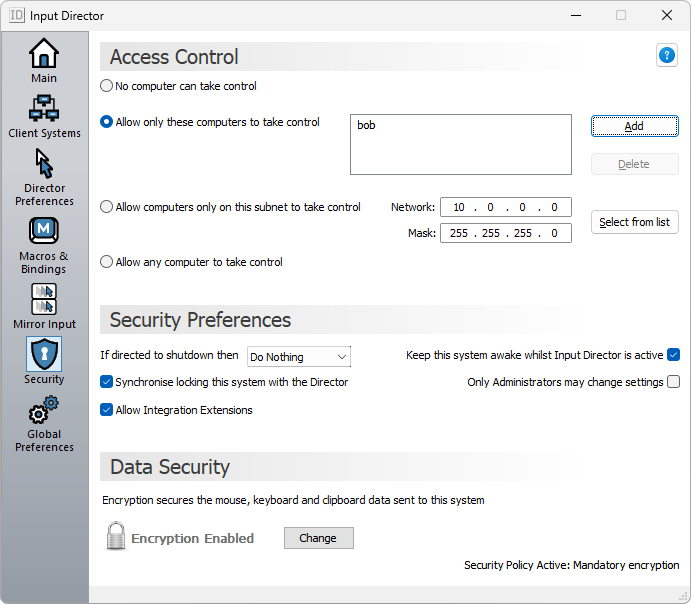
If you are using Input Director on a network that isn't secure or closed, you can choose to enable data security to encrypt the information sent to a client system. Input Director uses the Advanced Encryption Standard cipher to encrypt data.
Encryption is configured on a per-client basis. So you can choose to only encrypt data to one client but not another. Also, you can set a different password for each client system if you wish.
If you have multiple clients and you want to have
data security active for all of them, you need to run through the following process for each client.
To setup encryption:
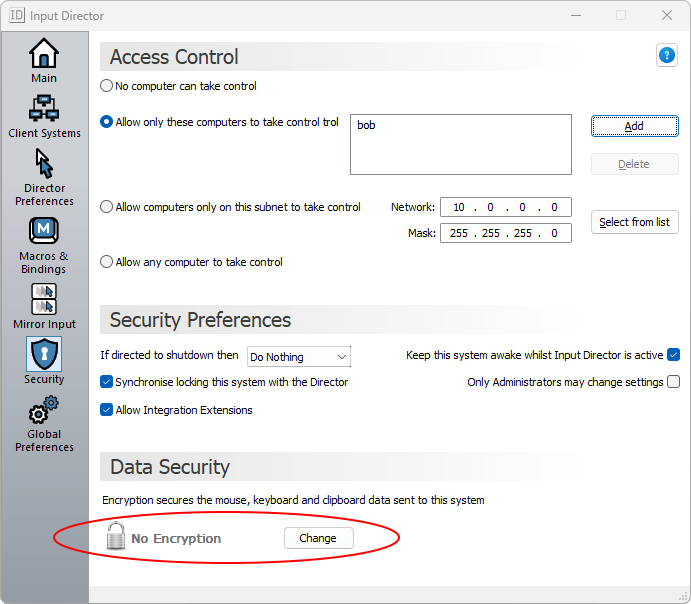
The unlocked padlock indicates that as a client, the system does not have encryption active.
Click the Change button to bring up the Set Security dialog box:
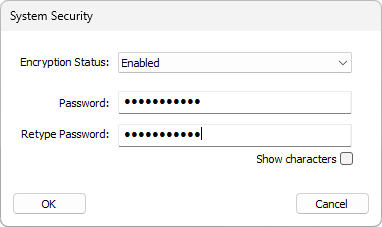
Input Director does not enforce password standards (such as a minimum length or a mixture of alphabetic and numeric characters). You must ensure you pick a difficult to guess password. It is recommended that a password is at least 8 characters and contains one or more non-alphabetic characters. Passwords are case-sensitive.
Click Okay to activate encryption on the system.
Open Input Director on the Director and switch to the Client Systems tab:
Select the client that now has data security enabled and click Edit to open up the System Configuration window:
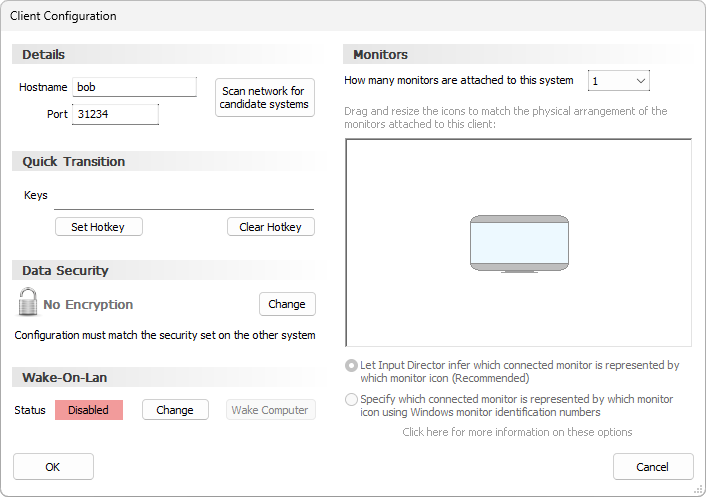
Click the Data Security Change button to set the corresponding data security settings for the client system
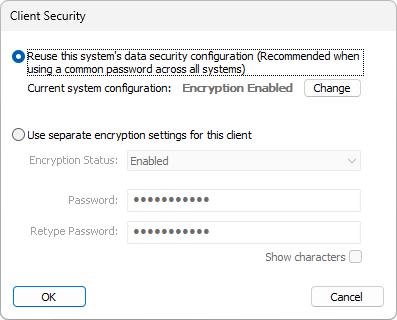
You have the option to re-use the encryption settings already set on this Input Director system (managed from the Security tab). This is the best choice when using a common encryption password across all computers. Alternatively, separate encryption settings can be configured for each client.
Click OK to save your changes
Input Director will now attempt to communicate with the client. If the password doesn't match the client system then a message will pop-up. This check is also made when you click the "Check systems availability" button on the Client Systems tab
If there is a mismatch between the data security encryption set on a client and its configuration on the Director, the Director will automatically 'skip' that system.
If your Client system does not have a keyboard/mouse attached to it, always change the data security on it first. Then update that client's security settings on the Director.Input Director can export and import its configuration using an XML formatted document. Detailed information on how to do so and the structure of the document can be found here.
Input Director includes a command line tool that can be used to query its status, change which system is being directed, switch profiles and even send a sequence of keystrokes to another system. Have a look at the relevant documentation for more information.
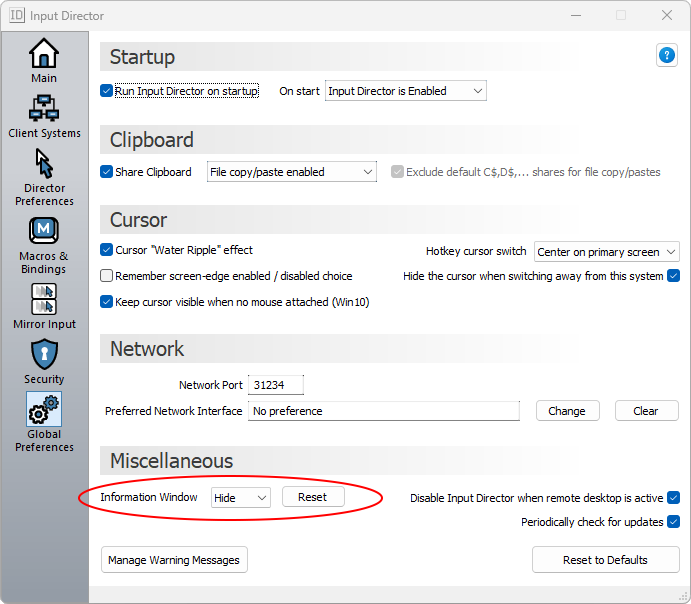
Press the "Show" button and the Information Window will pop-up in the bottom-right hand corner of the screen:

If the window doesn't pop-up, make sure that Input Director is enabled.
When input switches from one system to another, all Input Director systems displaying the information window will be updated. For example:

The information window can be resized by positioning the cursor on the edge of the window (the cursor will change to a double-headed arrow), holding down the mouse button and dragging the mouse. The contents will be scaled accordingly.
The window can can re-positioned by putting the mouse anywhere in its center and then holding down the mouse button. The cursor will change to a four-headed arrow and the window can be moved to a different location.
The preferences for the Information Window are found in its context menu. To open this menu, right-click on the information window:
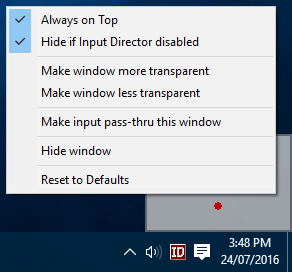
From here you can make the window more or less transparent, uncheck the "Hide if Input Director disabled" flag so that the window is always visible, or uncheck the "Always on Top" flag so that other windows can obscure it.
If you select "Hide window" and you change your mind, you'll need to return to the Global Preferences tab in Input Director and re-press the Information Window's "Show" button to redisplay it.
"Make input pass-thru this window" means that once enabled, any clicks on the information window will pass through it to any window or the desktop below it as if the Information Window isn't there. This means that once you have enabled this option you cannot resize, reposition, change the transparency of the Information Window, as you will not be able to right-click on it to bring up the context menu. To be able to change it again you must bring up the Global Preferences tab in Input Director and click the Information Window "Reset" button.
The idea behind the "Make input pass-thru this window" is that once you have sized and positioned the Information Window, this option can be selected and then it will not interfere with the control of other windows, icons on the desktop, etc even if it is overlaid on top of them:
If you have further questions about Input Director, the next port of call is the FAQ or you can contact the author.
