The configuration for Input Director can be imported and exported as a file. This can be used to for a variety of purposes, from migrating the configuration from one computer to another or to change a single setting.
Input Director configuration files are formatted in XML and follow a simple structure that has been designed to maximise readability, maintainability and writeability.
Configuration files don't need to be written from scratch. Instead, it's easiest to configure Input Director on a system, export the configuration, and then if desired make any edits or remove sections not required.
As all settings within a configuration file are optional, configuration files can contain just the settings you wish to apply to a system. As an example, the following sample changes the configuration so that only Local Administrators can make config changes:
Configuration settings closely match the settings and descriptions found in the user interface and the usage guide is a good resource to understand the purpose of a particular setting.
Any minor differences have been called out in Section 3 below, covering the configuration tags and structure.
2. Usage
2.1 Import/Export from the application
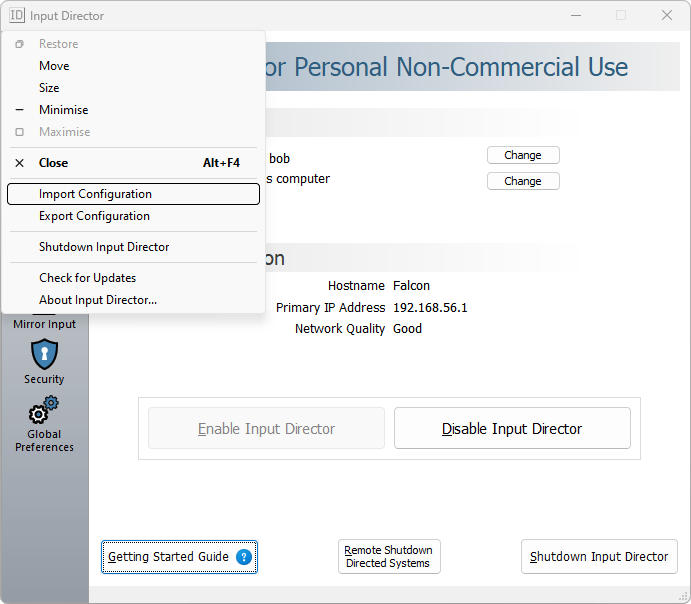
To import or export configuration from within the Input Director application, click the "ID" icon in the top-left corner of its window and select the required option from the pull down menu. If
importing, Input Director will first verify that the configuration is valid, displaying any errors found in the file. Providing the selected xml file is fine, it will import the configuration and restart the application to activate it.
If Input Director has been set so that only Local Administrators can make changes, then only administrators will be able to import and export configuration files.
2.2 Import/Export using the command line tool
Configuration files can be imported and exported using a command line tool. The tool can be used interactively from the command line or called as part of a batch file / script.
To use the tool, provide either the -importconfig or -exportconfig switch with a filename. If the filename includes spaces, then it can be wrapped in quotes like so:
n.b. IDCmd must be run from the Input Director install directory, alongside the rest of the Input Director files.
Running IDCmd will result it in displaying a success message or error information. If using the tool as part of a batch file you can test its return code - IDCmd will issue a return code of 0 for success and 1 if there was an error.
Input Director cannot be running whilst IDCmd is executing. As such, when IDCmd is run it will check if InputDirector is running and if so it will shut it down. After importing/exporting the configuration it will restart Input Director.
Input Director is restarted using the logged in user's credentials. This ensures that if an elevated (Admin) shell is used to run IDCmd and import/export a configuration file, the restarted Input Director will not be running under the Administrator account.
If Input Director has been set so that only Local Administrators can make changes, then only administrators will be able to import and export configuration files.
3. XML Configuration Structure
Input Director settings hierarchy starts with the top-level tag "InputDirectorConfig". Sitting under it are "GlobalPrefs", "Security", "DirectorPrefs" and "Configuration". Each of these sections reflect the same configuration settings found on the Input Director user interface (with Configuration encapsulating the defined client systems, bindings and macros).
The following sections describe the four groups of configuration settings.
3.1 GlobalPrefs
The Global Preference settings consists of configuration common across a system regardless of it's role. The settings are analogues to those found under the "Global Preferences" tab within the application. A description of these settings can be found here.
The majority of settings are straightforward. A couple to be aware of:
PreferredNetwork
The preferred network tag can be empty (as in the example above), which indicates that no preferred network is set, or it can follow this form to define the network/mask (which must match one of the network interfaces on the computer):
The Security section covers access control, encryption and directive response settings. The settings are analogues to those found under the "Security" tab within the application.
A description of these settings can be found here.
Information on the Encryption tag can be found here.
3.3 DirectorPrefs
The DirectorPrefs tag defines settings used when a system is acting as a director and controlling other systems. These settings are analogous to those found under the "Director Preferences" tab within the application. A description of these settings can be found here.
The majority of settings are either true/false or numerical. There are a couple of exceptions:
Hotkeys
There are several different hotkeys that can be defined under DirectorPrefs. A hotkey must be one or more Key tags. This defines the combination of keys that must be simulateously depressed to trigger it. Information on setting the Key tag can be found here.
Transition
The Transition tag has a type attribute, which must be one of the following values:
Immediate
DoubleTap
Linger
When using DoubleTap or Linger, a time attribute can be included. In the case of DoubleTap, this element represents the amount of time the double tap must occur within to be recognised. For Linger, the element is the amount of time the cursor must be left at the edge of the screen to trigger a transition.
For example:
The MirrorControl tag has a type attribute, which must be one of the following values:
KeyboardAndMouse
KeyboardOnly
MouseOnly
3.4 Configuration
3.4.1 Profiles
Input Director can include multiple profiles. A profile encapsulates the client systems, their configurations, the monitor layout and options found on the "Client Systems" tab.
The Profiles tag includes an ActiveProfile attribute that refers to which of the 1..n profiles included is the default profile to activate on start.
A profile covers all the settings found on the "Client Systems" tab in the Input Director application.
It includes a hotkey (used to fast switch to it), the CursorWrapAround and SkipClientsOnStartup settings, and the Systems tag described below.
Profile - Systems
The Systems tag holds definitions for a profile's client systems that can be controlled by this system, and includes the details about the layout of all systems monitors.
Sitting under the Systems tag is a DirectorMonitorLayout tag used to define the number and layout of the director system's monitors, and 0 to many Client tags.
Monitor Layout
The MonitorLayout/DirectorMonitorLayout tag consists of 1 or more Monitor tags. Each Monitor tag has four attributes - top, left, bottom, right to specify the location of that monitor. The monitor unit-of-measurement is roughly 1-inch, though it's better to think of monitor positioning and sizing as relative to each rather than in terms of absolute co-ordinates.
Using the example above, there are 3 systems (Director, Bob and Jane). The Director and Bob have one monitor each, and Jane has two.
A valid configuration must meet 2 criteria:
Monitors attached to a single system must be adjacent to each other (this is a constraint Windows imposes)
Monitors must not overlap
Client
A Client tag consists of a MonitorLayout, an optional Hotkey and an optional Encryption tag.
The hotkey is specified to be one or more Key tags. This defines the combination of keys that must be simulateously depressed to trigger the macro. Information on setting the Key tag can be found here
Information on the Encryption tag can be found here
3.4.2 Bindings
Bindings is an optional tag that is used to define the Director bindings. Sitting directly under it can be 0 to many Binding tags:
Each Macro includes 4 mandatory tags: Description, Target, Hotkey and Steps.
Target
The Target tag has a type attribute, which must be one of the following values:
CurrentFocus
Director
CurrentClient
Client
AllClients
AllButCurrent
AllSystems
If the type is set to Client, then the value of the Target tag must be the client system's hostname, as per the example above.
Hotkey
The hotkey must be one or more Key tags. This defines the combination of keys that must be simulateously depressed to trigger the macro. Information on setting the Key tag can be found here.
Steps
The Steps tag contains 1 or more Step tags. These represent the sequence of actions played by Input Director when the macro is triggered. Each Step tag has a type attribute, which must be one of the following values:
Key
Lockscreen
CtrlAltDel
EnabledScreenEdges
DisableScreenEdges
ToggleScreenEdges
When setting type="Key", there must also be a key attribute included. Valid values for the key attribute are defined here. An optional state attribute can also be included. This can be set either to "Down" or "Up". Without this attribute, Input Director will simulate pressing the specified key down and then simulate releasing it. The state attribute restricts the action to either pressing or releasing the key.
3.4 Key Definitions
Input Director configuration needs to refer to keyboard keys when defining macros, hotkeys and bindings. As such, the attribute key="name of key" is standardised and used in a number of different tags across the configuration.
For example, the hotkey to simulate a ctrl-alt-delete (located under DirectorPrefs) is:
When specifying a client's encryption (under the Systems tag), it be set to re-use the encryption set for this system's Security
<Encryption type="ReuseSystem"/>
Encryption Type
The type attribute on the Encryption tag can be one of these values:
None
AES128
AES192
AES256
Plaintext and Binary Keys
The shared secret can be provided either as a binary key (an "EncryptionBinaryKey" tag) or as plaintext (a "plaintextkey" tag). When passwords are keyed into the Input Director application, they are stored and used in a scrambled (hashed) form. As such, an exported configuration file can only include the hashed form of a key and uses the binary format. This format isn't user friendly when supplying a new password as part of a configuration file. For these instances, the plaintext tag can be supplied instead.